Cloudmon ITIM Installation Guide
Table of Contents
Overview
With more organizations opting to moving their applications to cloud-based environments, there is a fast-growing uptake in use of datacentre and cloud infrastructure. In the process, IT administrators face many challenges when monitoring the performance, security, and availability of such infrastructure. Enterprises face challenges in managing multiple toolsets and getting the right expertise to manage diverse and dynamic requirements.
Datacentre and Cloud providers are challenged in ensuring that SLAs are within agreed levels and that MTTR is low with efficiency of IT operations being high.
Cloudmon ITIM is a unified proactive infrastructure monitoring and diagnostic solution for enterprises, datacentre and cloud providers that presents the live status of all infrastructure entities and provides comprehensive diagnostics information for troubleshooting.
Veryx Cloudmon ITIM consists of:
- A central Controller – UI portal and the master, that needs to be installed in a server (physical/virtual).
- Agents – KPI monitor, which are installed in devices to be monitored (servers, VM, docker host, desktops & laptops).
- Probes – SNMP Poller & IP endpoint synthetic monitor, which are normally co-located with the Controller, but may be also located in other places within the organization wide network in case of larger.

| Controller | OS supported: Linux CentOS 7.9, Windows (using Hyper-V) Hypervisors supported: VMWare, QEMU / KVM, Hyper-V Public Cloud supported: AWS, Azure, GCP |
| Probe | OS supported: Linux CentOS 7.9, Windows (using Hyper-V) Hypervisors supported: VMWare, QEMU / KVM, Hyper-V Public Cloud supported: AWS, Azure, GCP |
| Agents | Linux: CentOS 7+, Ubuntu 14+, RedHat 6+, Debian 8+, Amazon Linux 2 Windows: Version 10+, Server 2012+ |

Note:
- Veryx Cloudmon ITIM controller and probes.
- Veryx Cloudmon ITIM Basic – our lifetime free edition currently supports 25 nodes (i.e., addressable IP interfaces).
- Veryx Cloudmon ITIM Standard and Pro editions are paid versions that provide higher feature sets and higher number of nodes. For a comparison of the feature sets refer here.
- If you wish to explore these paid versions, please contact our sales team.
System Requirements
The following information outlines the critical system requirements for the self-hosted option, enabling users to install and oversee Cloudmon on their infrastructure. These system requirements have been determined with various deployment scenarios in mind, aiming to help organizations choose the most appropriate configuration for their monitoring environment.
|
|
Basic – Free (up to 25 nodes)
|
Small (up to 250 nodes)
|
Medium (up to 1000 nodes)
|
Large (up to 5000 nodes)
|
|
Cloudmon Server |
CPU: 2 cores RAM: 4 GB (8 GB recommended) Storage: SSD with at least 16 GB capacity |
CPU: 4 cores RAM: 8 GB Storage: at least 16 GB capacity |
CPU: 4 cores RAM: 8 GB Storage: at least 16 GB capacity |
CPU: 8 cores RAM: 8 GB Storage: at least 16 GB capacity |
|
Network requirements: Outbound – 22, 25, 465, 587, 27017. Inbound: 80, 443. Internet access: https://repo.veryxtech.com, https://pro.ip-api.com OS: CentOS Linux 7.9 |
||||
|
Cloudmon Database (MongoDB 4.4+) |
Not Applicable |
CPU: 2 cores RAM: 8 GB Storage: SSD with at least 64 GB capacity |
CPU: 4 cores RAM: 16 GB Storage: SSD with at least 128 GB capacity |
CPU: 8 cores RAM: 32 GB Storage: SSD with at least 512 GB capacity |
|
Network requirements: Inbound: TCP/27017 OS: Windows or Linux |
||||
|
Additional Probes |
Not Applicable |
CPU: 2 cores, RAM: 4 GB, Storage: at least 8 GB capacity |
||
|
Network requirements: Outbound – 80, 443 and monitored ports, Inbound: TCP/30000 . Internet access: https://repo.veryxtech.com, https://pro.ip-api.com OS: CentOS Linux 7.9 |
||||
|
Agents |
CPU: 64-bit processor RAM: 128 MB of free memory Storage: Sufficient disk space for agent installation and temporary data storage, less than 200 MB OS: Windows 10+, Windows server 2012+, Ubuntu, Fedora, CentOS, RedHat Linux, Suse Linux and more |
|||
|
Note: Cloudmon Database can be installed along with the Server with same database system configuration. For Deployments larger than 5000 nodes and High availability contact sales@veryxtech.com
|
||||
Cloudmon ITIM on Windows / Hyper-V
Cloudmon ITIM can be installed as a Hyper-V virtual machine on any Windows Pro / Enterprise (version above 10) and Windows Server editions.
Follow the steps below to install:
- Download Cloudmon ITIM VHDX image.
- Use the one-line automated script (mentioned in the section 3.1.2) to install Cloudmon on any Windows Pro / Enterprise version above 10 and Windows Server editions.
Installation Process on Windows / Hyper-V
Prerequisites
The following prerequisites are needed to successfully run Client Hyper-V on Windows 10+:
- Windows 10+ Pro or Enterprise 64-bit Operating System
- 64-bit processor with Second Level Address Translation (SLAT)
- 8 GB system RAM at minimum
- BIOS-level Hardware Virtualization support
- Administrative privilege
Procedure
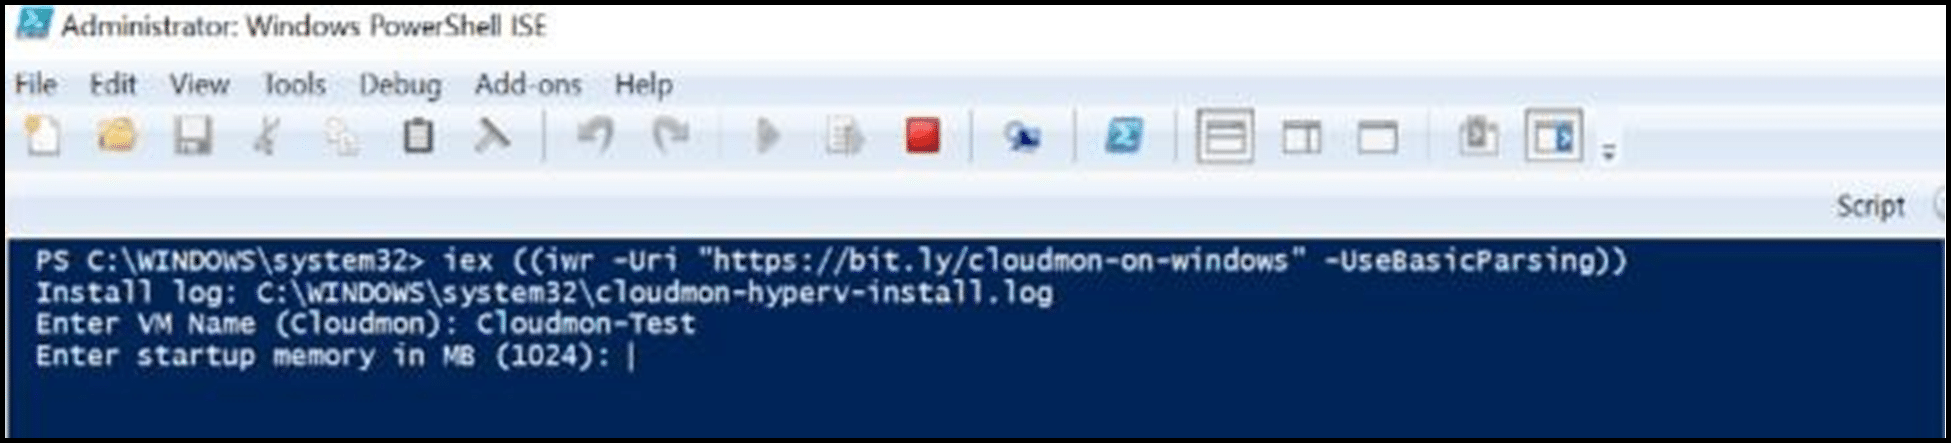
- Launch Windows PowerShell ISE as an administrator.
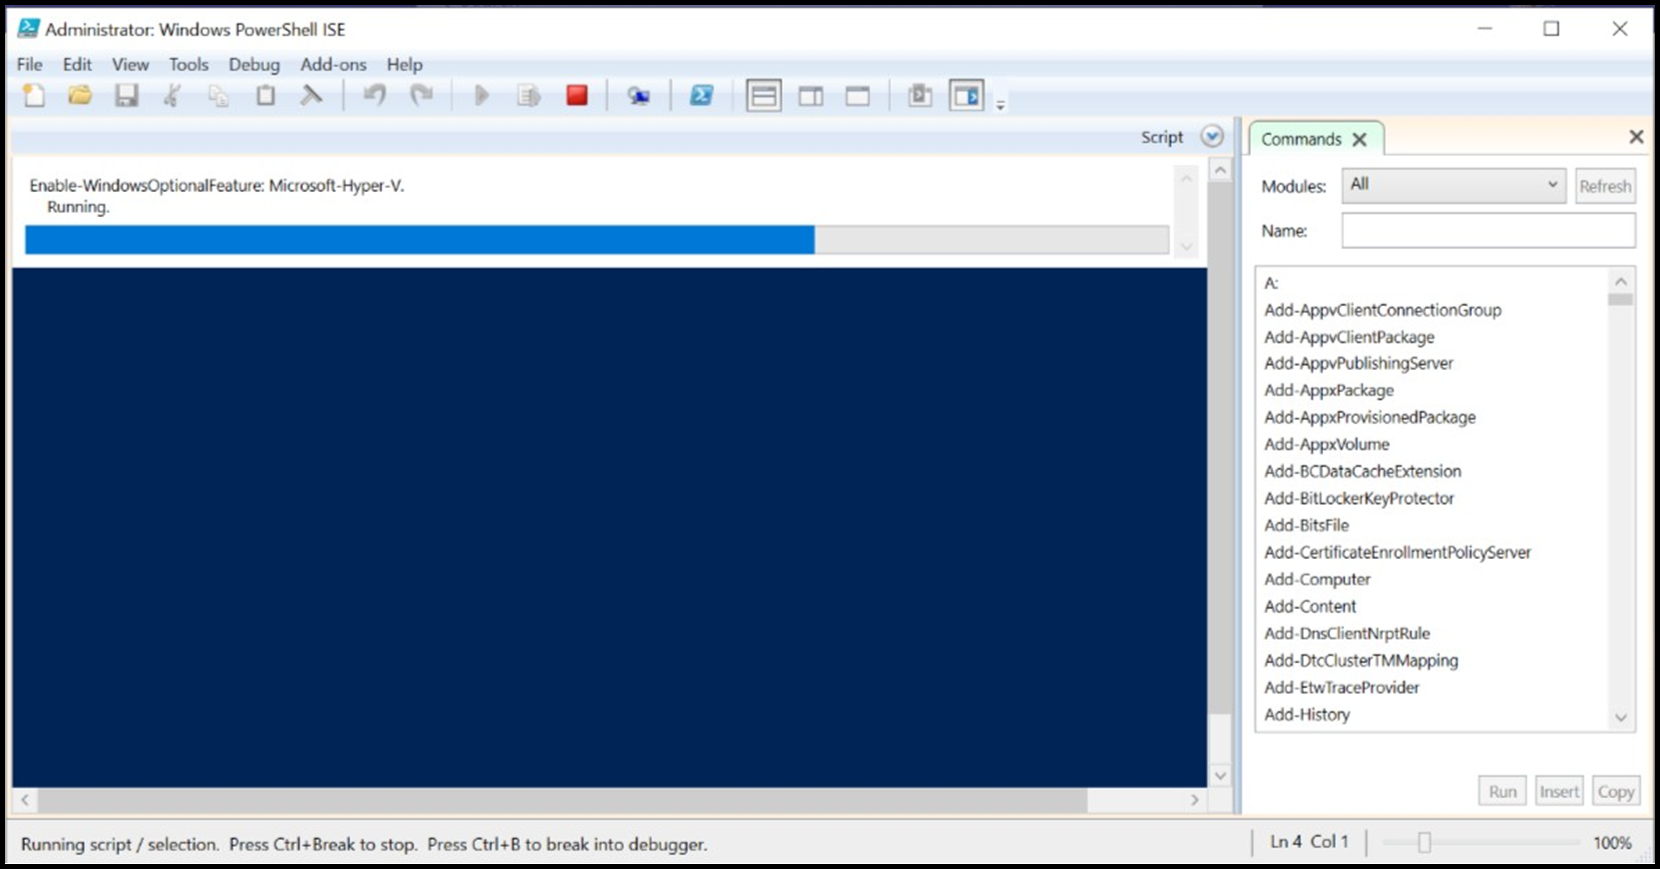
- Execute the command to enable Hyper-V and press Enter.
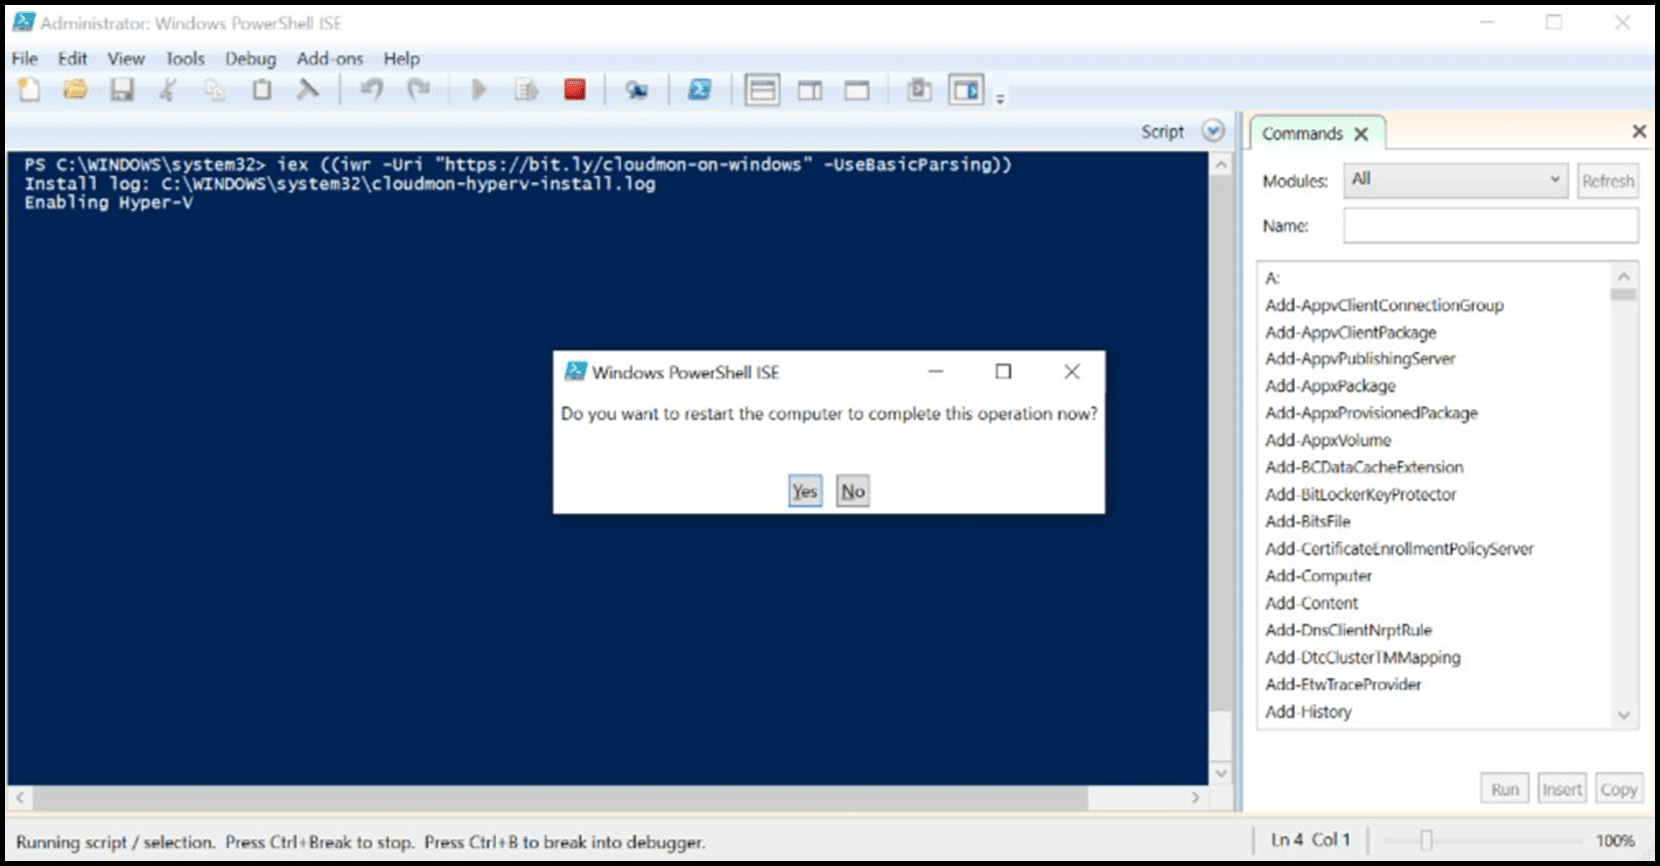
iex ((iwr -Uri “https://bit.ly/cloudmon-on-windows” -UseBasicParsing))
- Restart your machine when prompted after Hyper-V is enabled.
- Reopen Windows PowerShell ISE as an administrator after the machine has restarted.
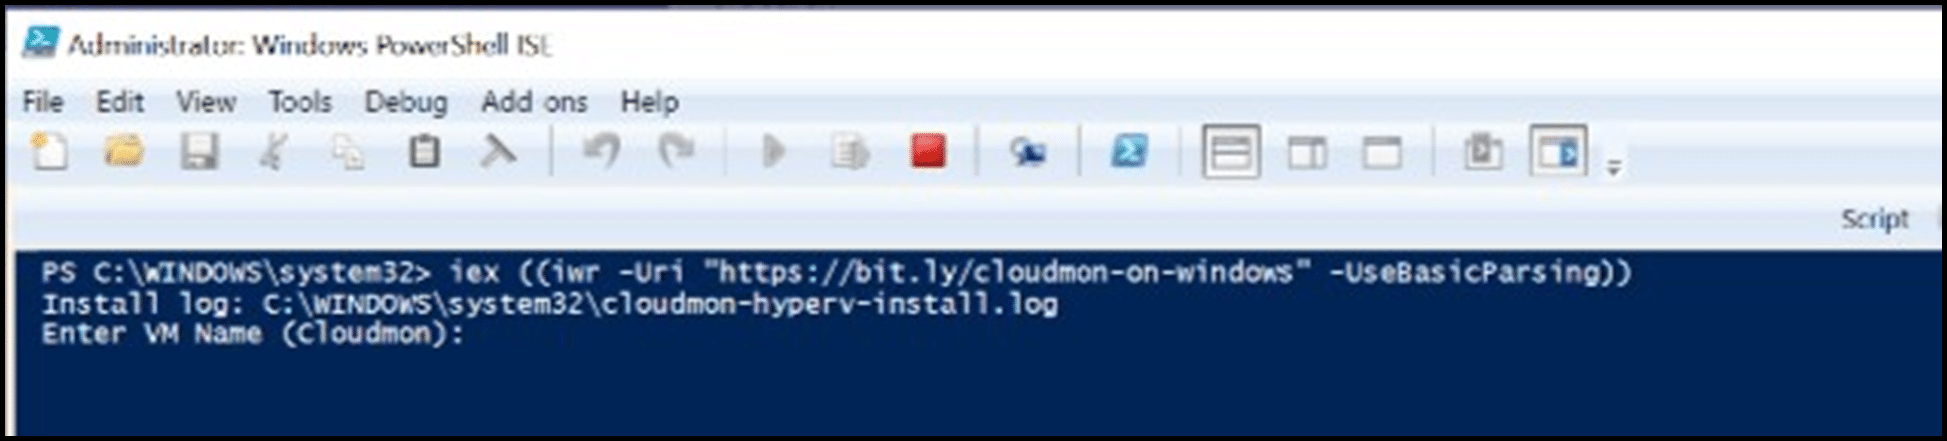
- Execute the below command again to create a virtual machine.
iex ((iwr -Uri “https://bit.ly/cloudmon-on-windows” -UseBasicParsing))
- Provide a name or press enter to accept the default name present within the brackets.
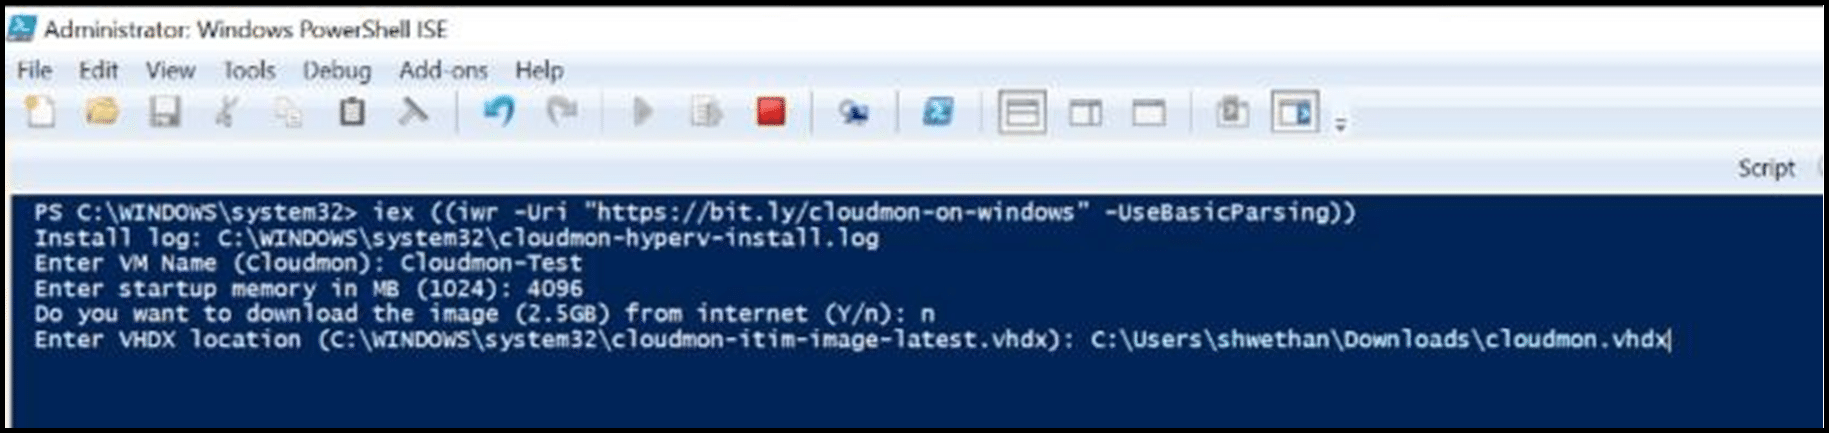
- Provide your preferred Startup Memory (MB) size or press Enter to accept the default value present within the brackets.
- Download the VHDX image either directly from the internet or beforehand and provide the exact location.
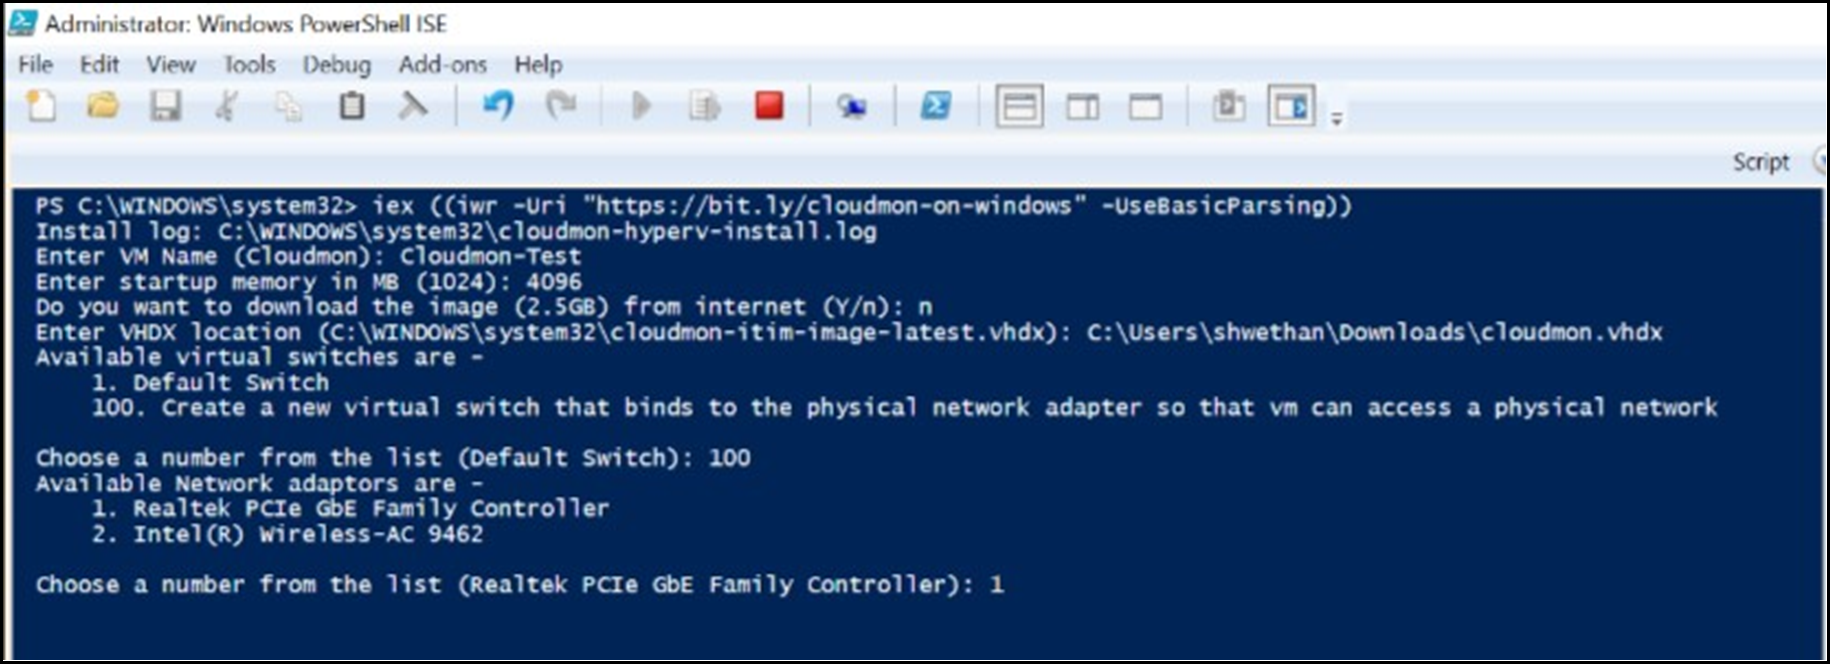
- Create a switch by either selecting an existing one or creating a new one.
- . Upon confirmation, the virtual machine will be created and launched successfully, displaying the Cloudmon console.
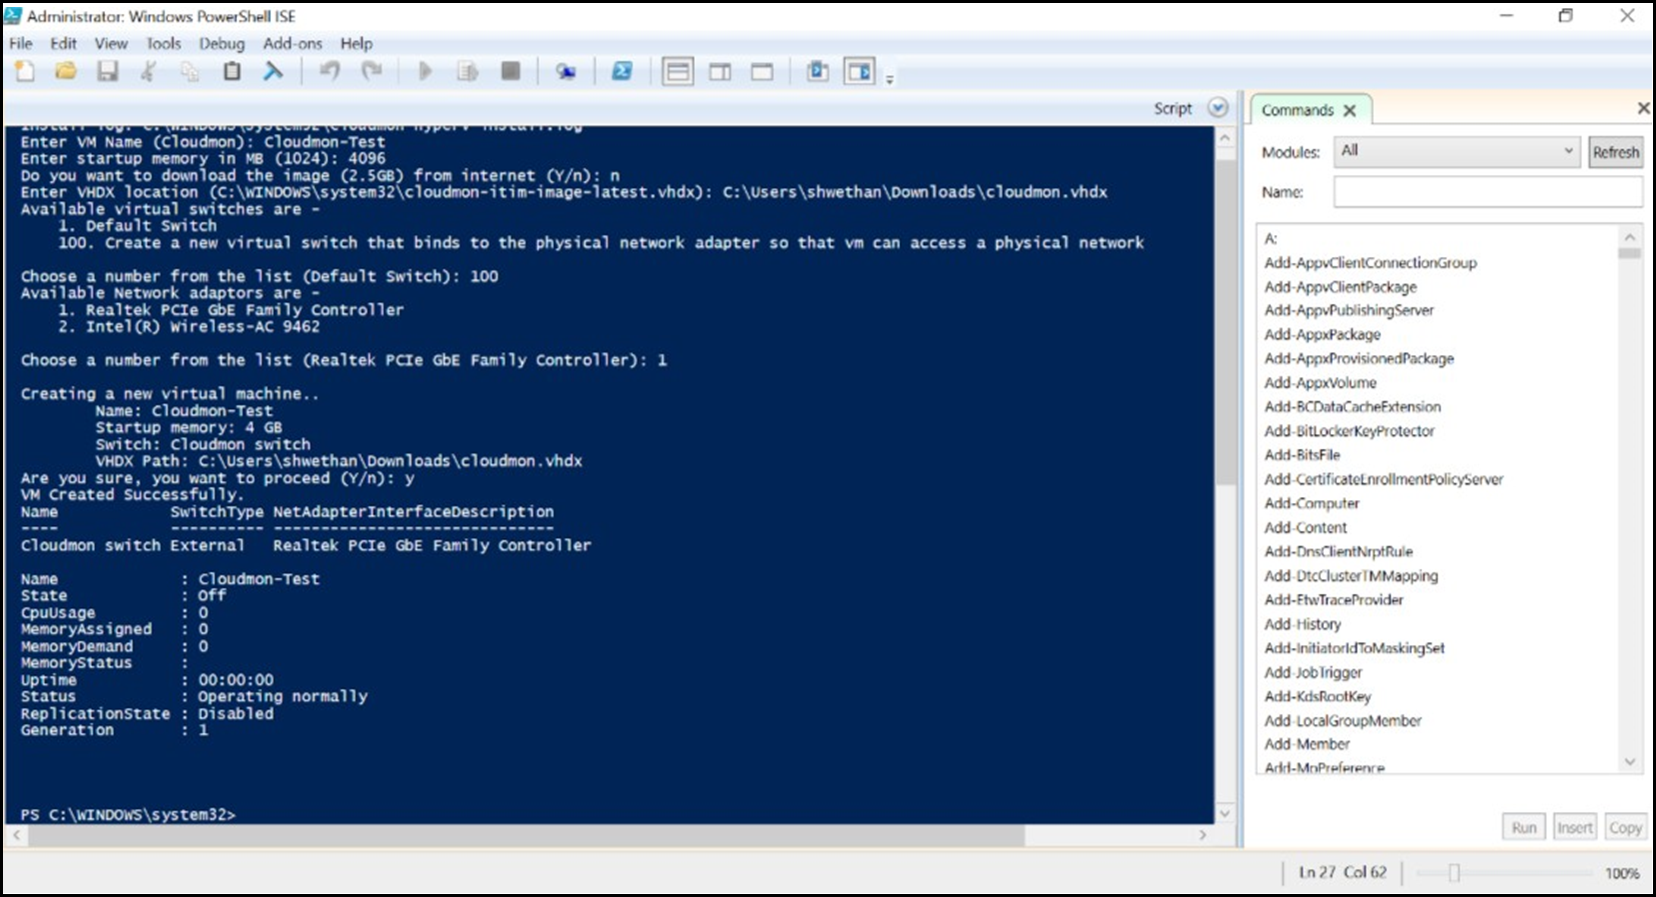
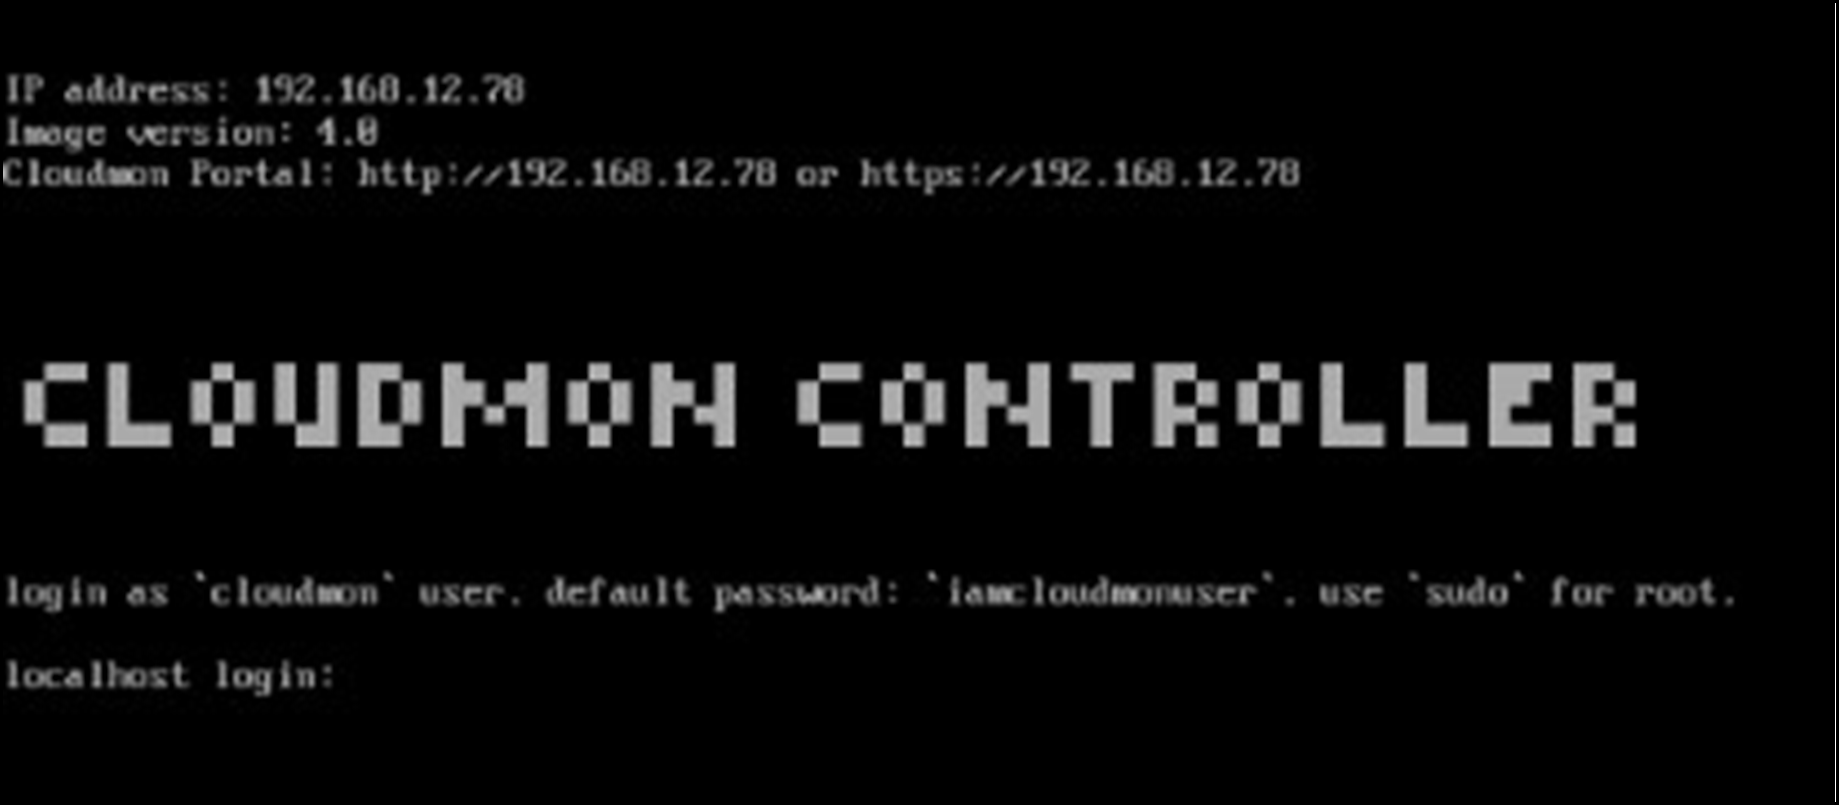
- On the successful opening of the Cloudmon virtual machine, you can see the Cloudmon console. The console will display the IP address assigned and how to access Cloudmon portal.
- For assigning IP address or route manually, refer section Configuring IP address.
- Using Chrome or Firefox or Microsoft Edge browser open Cloudmon portal using – https://<VM IP address> or http://<VM IP address>
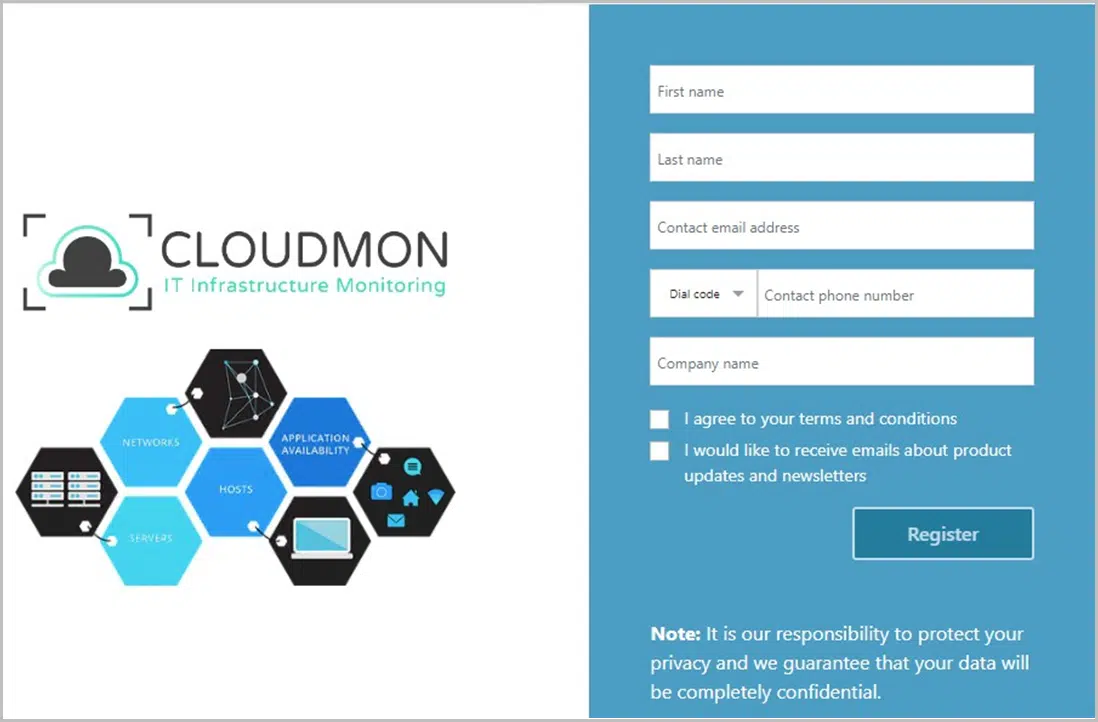
- Upon first time access, you will be directed to registration page. Fill in your details, the administrative login and password details will be sent to the given email address.

Cloudmon ITIM on VMware
Cloudmon ITIM can be installed as a VMware virtual machine on VMware ESXi host. Follow the below steps to install:
- Download Cloudmon ITIM OVA image.
- Login into VMware ESXi host.
- Create Cloudmon ITIM as Virtual Machine.
Login into VMware ESXi host
- Open browser, enter the IP Address/ Hostname of ESXi.
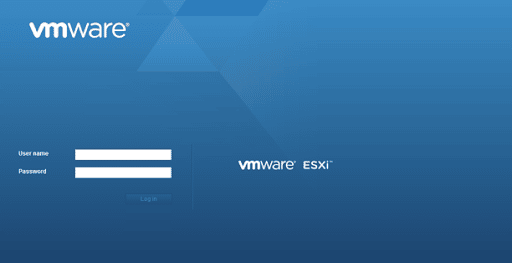
- Enter the Username and password.
- Click on Log in.
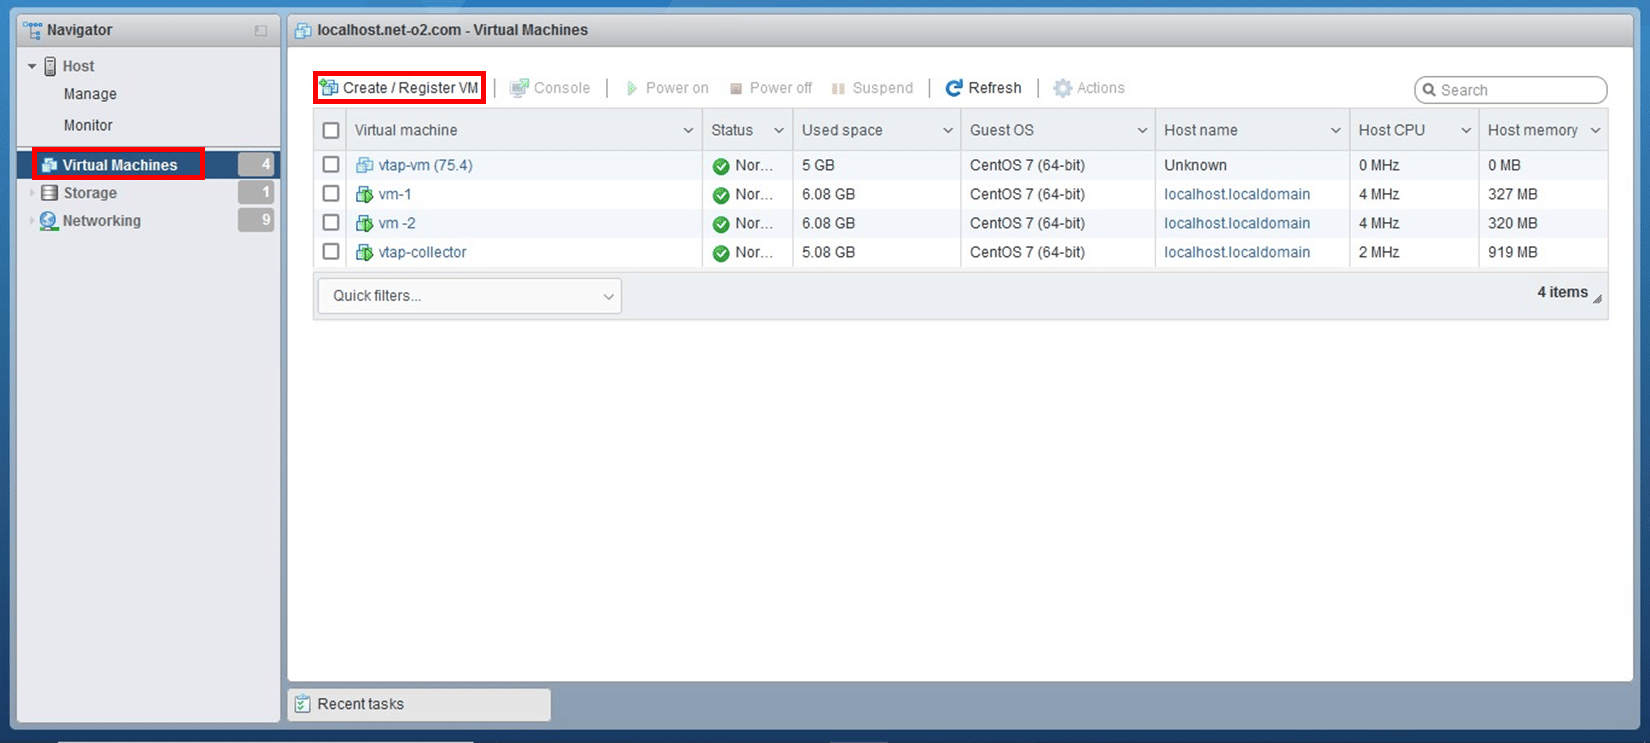
Create Cloudmon ITIM as VMware Virtual Machine
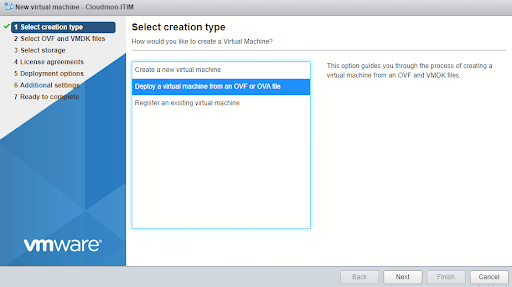
- Select the Virtual machines menu, click “Create/ Register VM”.
- Click on “Deploy a virtual machine from an OVF or OVA file” and click on “Next”.
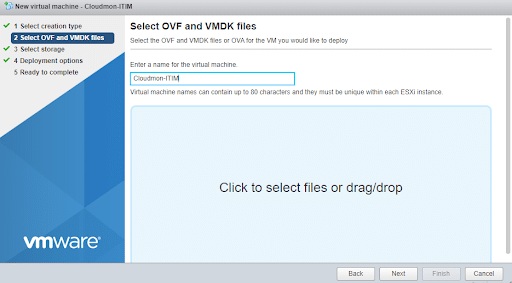
- Enter a name for the virtual Click on the below blue box to select the Cloudmon ITIM OVA and then click next.
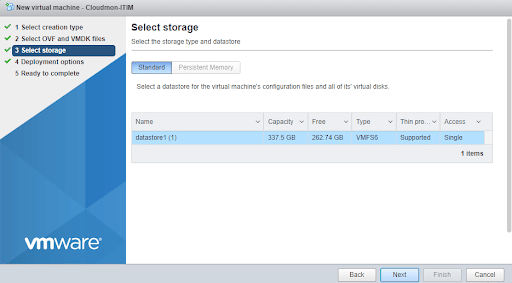
- Select the storage and click on Next.
- Select Network mappings, enable Power on automatically, and click on Next.
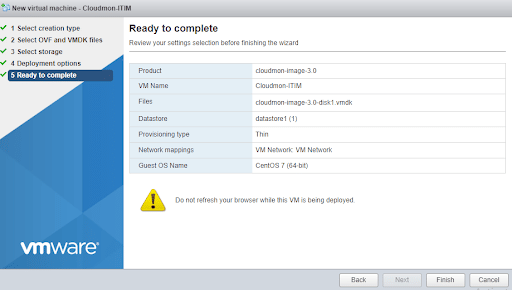
- Just Review once and click on Finish.

- Open the Cloudmon ITIM Virtual machine, by clicking on its name.
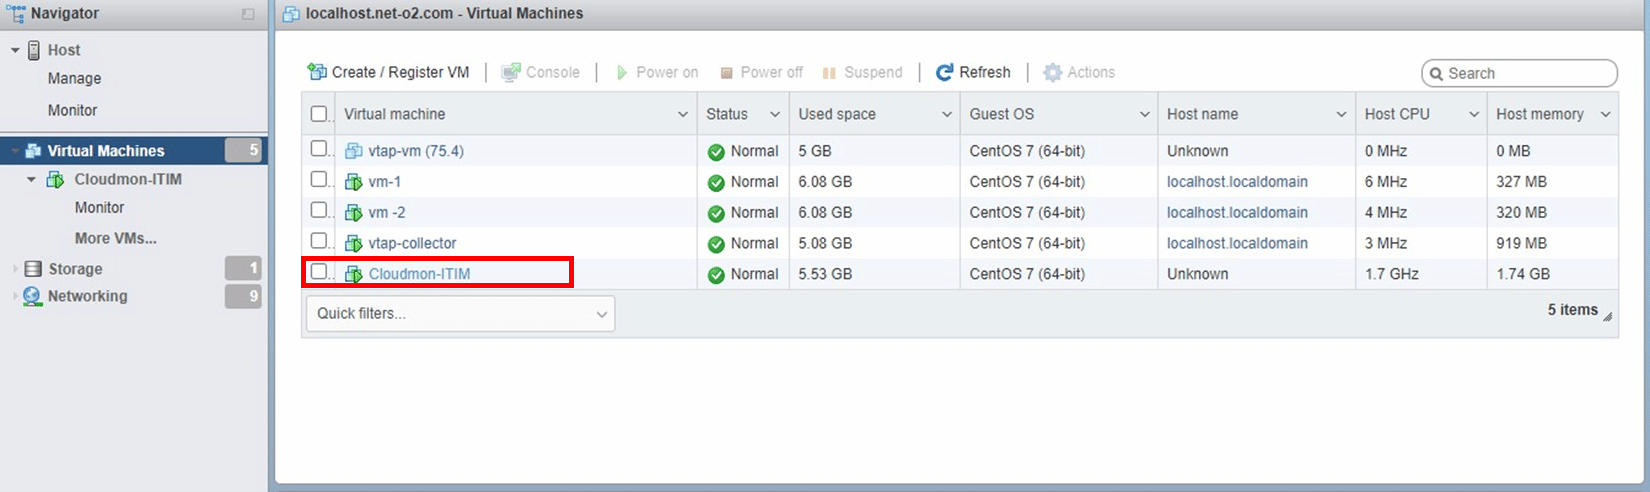
- On the successful open of the Cloudmon ITIM virtual machine, you can see the Cloudmon The console will display the IP address assigned and how to access Cloudmon portal.
 Note:
Note:
By default, the Cloudmon uses DHCP to get IP address automatically (there could be a delay, press enter if you do not see an IP address)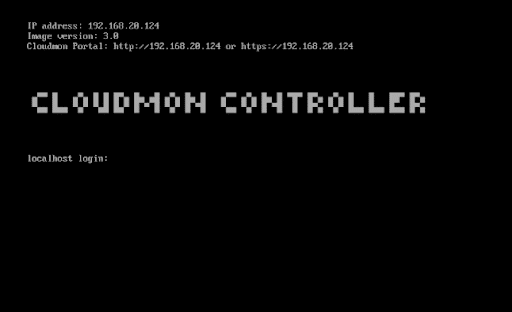
- For assigning IP address or route manually, refer section Configuring IP address.
- Using Chrome or Firefox or Microsoft Edge browser open Cloudmon portal using – https://<VM IP address> or http://<VM IP address>
- Upon first time access, you will be directed to registration page. Fill in your details, the administrative login and password details will be sent to the given email address.
 Note:
Note:
Ensure internet access is available during this process. We encourage to have internet connectivity all the time to get periodic product updates

Cloudmon ITIM on CentOS Server
- Open the terminal in your server.
- Ensure you have elevated access and internet connectivity.
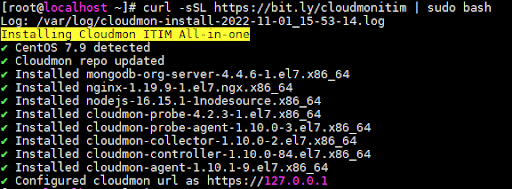
- Execute the following command to install Cloudmon ITIM All-in-One,
curl -sSL https://bit.ly/cloudmonitim | sudo bash This will install the following components,
- Cloudmon ITIM Controller, which stores data and provides you the dashboards, reports and more.
- Cloudmon ITIM Agent, which helps you monitor system metrics of this server.
- Cloudmon ITIM Probe, which helps you monitor IP endpoints and Network devices.
Please refer to the image below, the following will be obtained after command execution.
- For assigning IP address or route manually, refer section Configuring IP address
- Using Chrome or Firefox or Microsoft Edge browser open Cloudmon portal using – https://<VM IP address> or http://<VM IP address>
- Upon first time access, you will be directed to registration Fill in your details, the administrative login and password details will be sent to the given email address.
Note:
Ensure internet access is available during this process. We encourage to have internet connectivity all the time to get periodic product updates.

Configuring IP address
For assigning IP address or route manually
- Login into the VM using the following credentials,
Username: cloudmon
Password: iamcloudmonuser - Enter “cloudmon” to view all the commands supported.
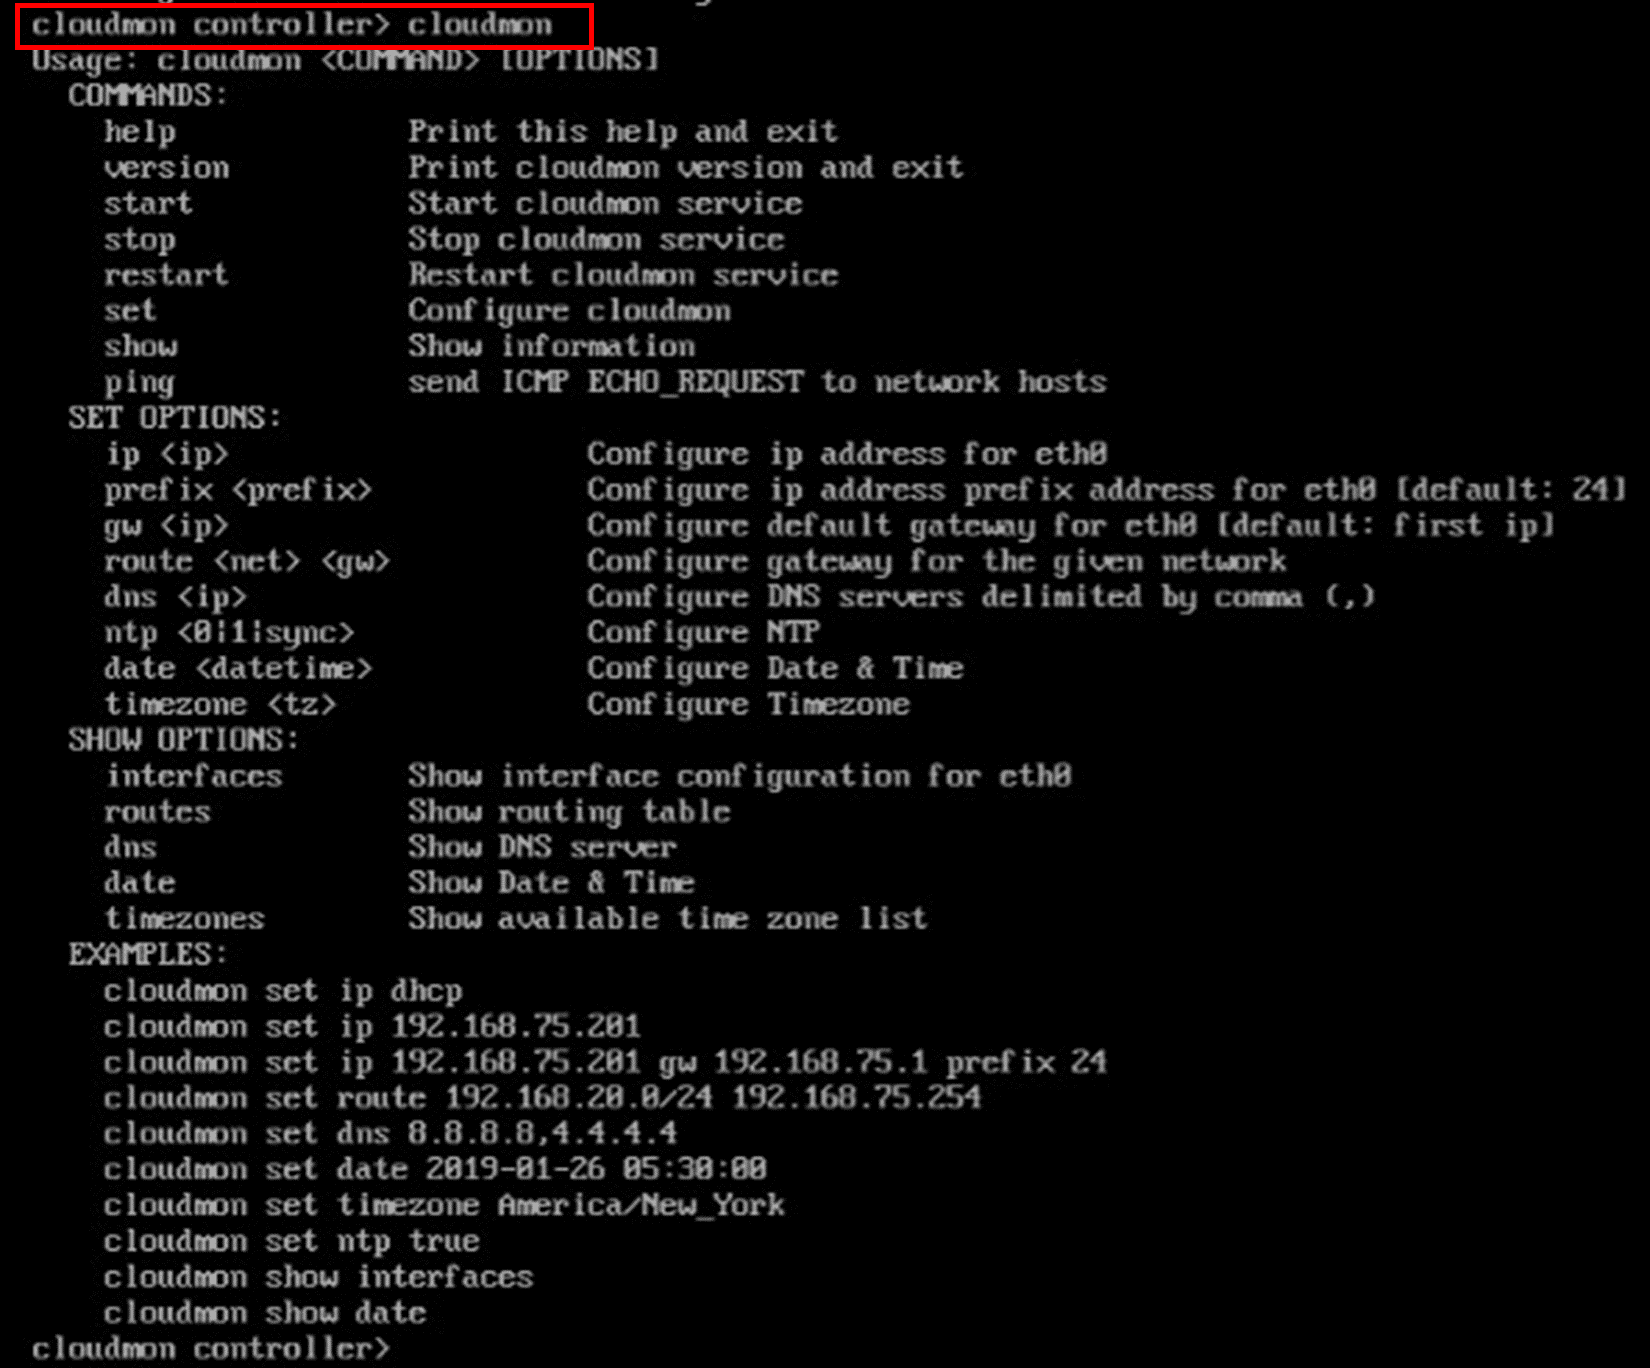
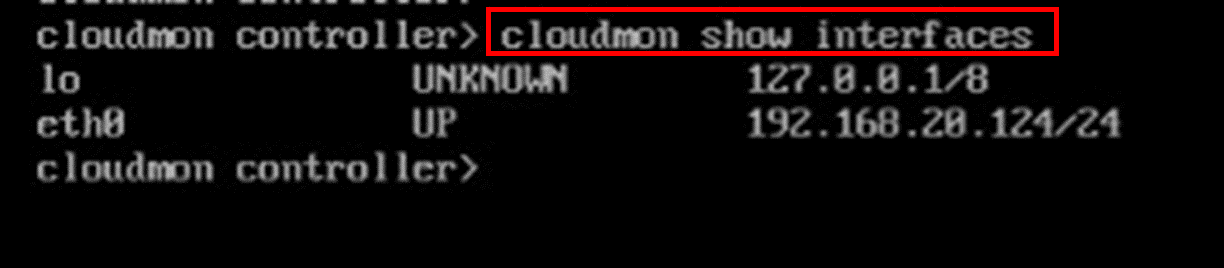
- Command to assign IP Address:
- cloudmon controller > cloudmon set ip 192.168.12.61
- Enter “cloudmon show interfaces” to view the assigned IP Address.